

Moodle Assignment Activity
An Assignment allows you to communicate tasks, collect work, and provide grades and provide graded feedback to your students.
Creating the Assignment Activity
Step 1: From within your course in Moodle, click the Edit mode toggle to turn editing on. In the topic area you would like to place the Assignment activity, click Add an activity or resource and select Assignment.
Step 3: For General settings, fill in the Assignment Name and Description areas. The Description is where you provide the student with instructions about the assignment.
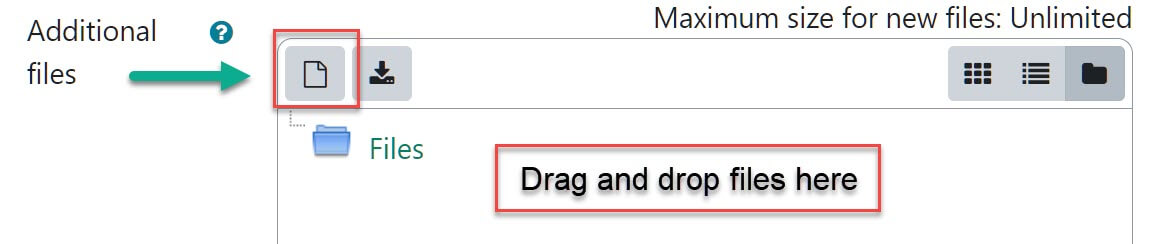
Additional files is for you to include files needed to complete the assignment. You can either drag and drop your file into the text area where the blue file folder is, or click the Add… (piece of paper with corner folded) icon in the left corner of the menu box to browse for the file you would like to attach.
Availability settings, you can choose to set a date for when you will start accepting assignment submissions, an assignment Due date, and a final Cut-off date after which students will no longer be able to submit work. If you create a due date, it will appear on the course page underneath the assignment.
Submission types, choose Online text if you would like students to type their response in a provided text box and submit, File submissions to have students upload and submit a file to you, Online PoodLL to have students submit an audio recording, or choose all three. For File submission, don’t forget to select the Maximum number of uploaded files you will allow.
Feedback types, this is how you prefer to leave students feedback. You can check one or all of the choices. Choosing Yes to Comment inline will copy the student’s online text submission into the feedback comment area during grading, allowing you to comment inline or edit the original text.
Submission settings, we suggest that the Require students click submit button setting be set at No. When set to Yes, it requires the student to go through an extra step to submitting, which they often miss.
Group submission settings, applicable if you are using groups.
Notifications, Notify graders about submissions if set to Yes will send an email to you letting you know when a student submits and an email to the student telling them they submitted, Notify graders about late submissions will send you an email when a late assignment submission has been made, and Default setting for “Notify students” if set to Yes will send an email to students each time you enter a grade for them in the grade book, if set to No then students will not receive an email that there has been an update to their grade book.
Grade, select your points, and what Grade category you would like to place the Assignment in your grade book.
When finished making your selections, click the Save and return to course button at the bottom of the page.
Grading Assignments
You can grade assignments directly in the grade book or from within the assignment area.
Grade Book Interface
Step 1: From within your course, open your grade book by selecting the Grades tab. Enter grades.

Assignment Interface
The advantage of using an Assignment in Moodle is the ability to grade within the interface of the Assignment area.
Step 1: From within your course, click the Assignment to open it.
Step 2: Click View all submissions. This opens the Submissions table for the assignment. (Note: There is a Quick grading option, see below.)
Step 3: In the Grade column, click the Grade button. This will open the grading interface page for the student you are grading.

Submission status: you can see the student submitted their assignment, the file that was submitted, and any submission Comments from the student.
In the Grade area, enter the Grade, type in any Feedback comments, or upload any Feedback file.
Step 4: When finished, click the Save changes button at the bottom of the screen.
Single View Grading
You can use this view to grade everyone for this assignment from one page, provided the assignment was manually added to the gradebook.
Step 1: From within your course, open your grade book by selecting the Grades tab.
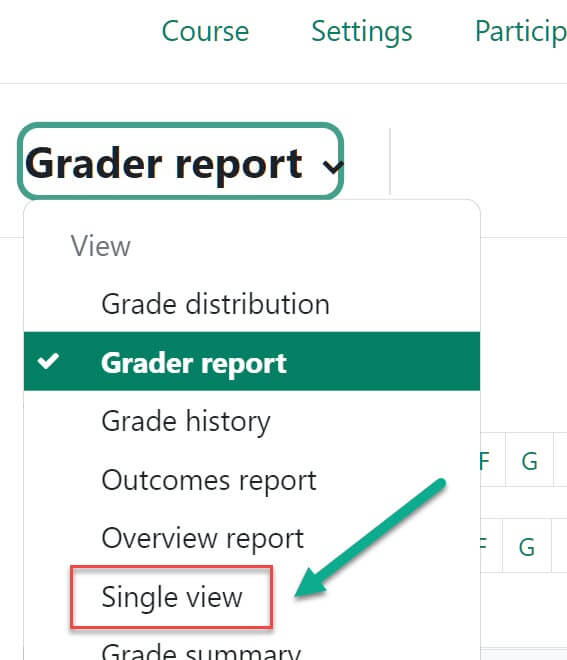
Step 2: From the Grader report drop down menu, select Single view:
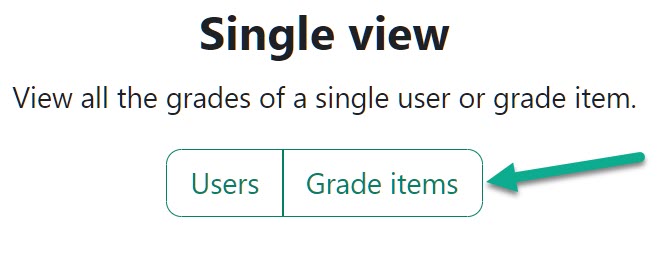
Step 3: Scroll down and click the Grade items button.
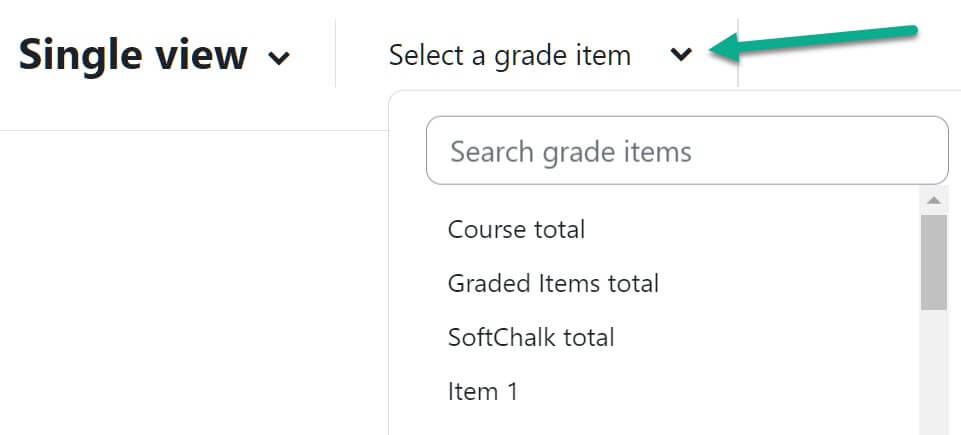
Step 4: From the Select a grade item drop down menu, select the activity you wish to grade and make sure that Edit mode is toggled to ON. You can now just grade right down the list of students.
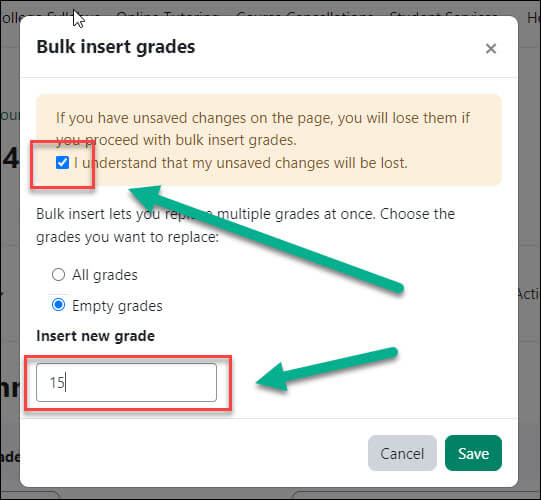
NOTE: If you want to quickly assign every student the same grade, click the Actions dropdown above the list of students and select Bulk insert grades. From the popup, select that you understand you’ll lose unsaved changes, then make your selection on whether you want to populate All grades or Empty grades and then add your desired awarded points in the Insert new grade box and click Save.
Quick Grading
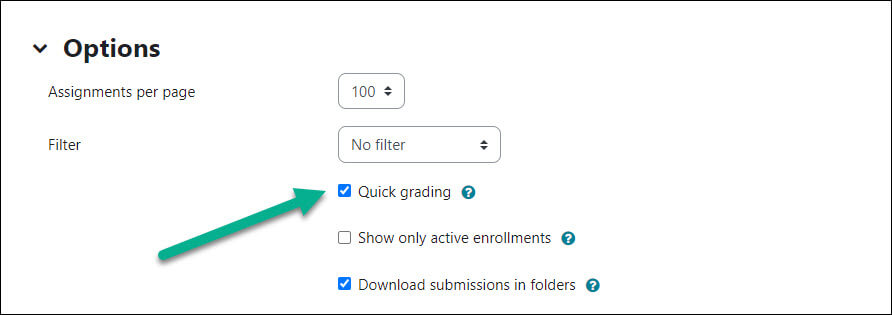
If you have Quick grading turned on, it will allow you to assign grades directly into the Submissions table. To use Quick grading:
Step 1: From within your course, click the Assignment to open it.
Step 2: Click on the View all submissions link. This opens the Submissions table for the assignment.
Step 3: Scroll to the bottom of the page, under the Options area click in the box for Quick grading to turn the feature on. The screen will refresh and there will now be boxes in the Grade column where you can directly enter grades.
Step 4: When you are finished grading, scroll to the bottom and click the Save all quick grading changes button.
For Moodle help, contact the NMC Technology Helpdesk at 231-995-3020