

Moodle Glossary Activity
The Glossary enables participants to create and maintain a list of definitions, like a dictionary, or to collect and organize resources or information.
Creating
Step 1: From within your course in Moodle, click the Edit mode toggle to turn editing on. In the topic area you’d like to add a Glossary, click Add an activity or resource and select Glossary.
Step 2: Enter the Name and Description information in the text areas provided.
Step 3: Review the settings available and set according to how you plan to use the Glossary.
- Is this glossary global? Should NOT be checked.
- Automatically link glossary entries: if set to Yes will create links and highlight words throughout your entire course.
- Ratings: allows you to grade glossary entries.
Step 4: When finished, click the Save and return to course button at the bottom. The Glossary is created and now appears on your course homepage.
Random Glossary Block
This block allows you to stream your Glossary entries into your course.
Adding & Configuring
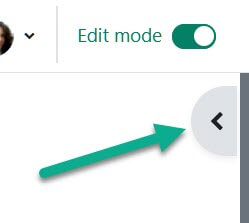
Step 1: From within your course make sure you have Edit mode turned on.
Step 2: If your blocks on the right side of the screen are not open, click the Open block drawer option in the upper right of the page to open them.
Step 3: Click Add a block and select Random glossary entry. The Random Glossary Entry block is added to your course and can be configured.
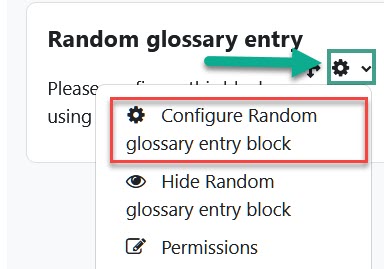
Step 4: Click the Actions icon (looks like a gear) in the right corner of the block and select Configure Random glossary entry block from the menu that drops down.
Step 3: Enter a Title for the block. From the Take entries from this glossary drop down menu select which glossary the entries should be pulled from. This allows you to have multiple glossaries in your course and/or change what is displayed in the block.
Step 4: Review and change any remaining settings. When finished, click the Save changes button at the bottom.
For Moodle help, contact the NMC Technology Helpdesk at 231-995-3020.