

Accessibility of a PDF depends on the accessibility of the original document. The best way to create a PDF is by converting from a source file like PowerPoint or Word.
Note for Mac users: MS Office 2011 and previous Mac versions of MS Office cannot be converted to an accessible PDF. LibreOffice is one alternative you can use.
Best Practice
The following are the steps you can take to know that you’ve created a PDF file that is accessible.
Step 1: Create your file in Word. Make sure to put alt text for your images, use proper document structure (headings, proper lists, etc.), and create appropriate link text. Everything we have learned so far.
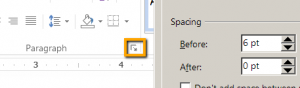
Tip: Use Paragraph properties and use Spacing Before and After rather than the Enter key to add space between paragraphs.
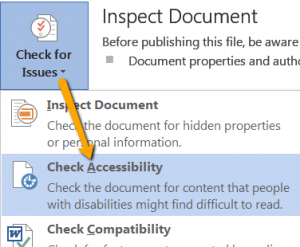
Step 2: Run the accessibility checker in Word and correct any issues found. Do this by clicking File, Check for Issues, Check Accessibility.
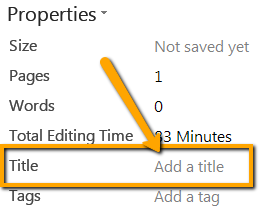
Step 3: Add a title to your document: Click File and then on the right side of the screen under Properties, find Title. Click to the right of Title where it says add a title and type in a title for your document.
Step 4: Save your Word document.
Step 5: Save document as a PDF – Click File, Save As, select save location, change Save as type to PDF, click Options…, make sure Document properties and Document structure tags for accessibility are check marked, click OK, click Save when finished.

PDF files created in this manner will be in the most accessible form.
Creating files in Google Docs and saving as PDF files will not be accessible. Scanning a document to PDF will not create an accessible document, it will only create a document that is an image. Finally, saving a document by selecting Print to PDF in Microsoft versions older than 2010 will not create an accessible format either.
Resources
Webaim: PDF Accessibility.
University of Washington: Creating Accessible Documents.