

Using the Moodle File Resource
Adding a File allows you to add any file from your own computer or storage device to use in your course.
Step 1: From within your course in Moodle, click the Edit mode toggle to turn editing on.
Step 2: In the topic area you’d like to add a File, click the Add an activity or resource link and select File.
Step 3: Enter a Name in the text area provided.
Step 4: In the Select files area you can either drag and drop your file into the text area where the blue file folder is, or click the Add… (piece of paper with corner folded) icon in the left corner of the menu box to browse for the file you would like to attach.

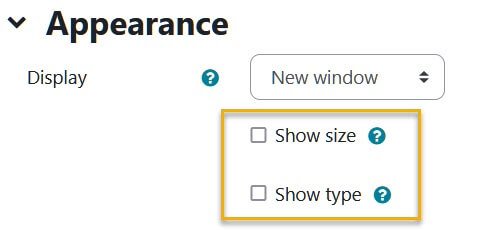
Step 5: Under Appearance, using the Display drop down menu, select how you would like the File to open, such as in a new window, a pop-up, or embedded.
Step 6: Also under Appearance, If you do not want the size and type of the file to show on your course page, make sure to uncheck the Show size and Show type checkboxes.
Step 7: When finished, click the Save and return to course button at the bottom.
For Moodle help, contact the NMC Technology Helpdesk at 231-995-3020