

While going green is great, sometimes there is just no replacement for the printed page. The following document is your guide to setting up printers using the printing tools and resources available at NMC.
NMC recently underwent a campus-wide update of printing resources which included (among other things) renaming all of the printers. This was done for several reasons:
- To make locating printers and devices easier.
- To make adding these printers and devices to your work PC simpler.
- To eliminate confusion by making Windows and Banner printer names match.
 This new naming convention was designed to include as much data as concisely as possible. Each printer name now indicates the location of the printer (building and room number), the manufacturer of the printer (HP or Kyocera Mita (KM)), as well as its color capabilities. The following printers illustrate these different aspects of the naming convention:
- JB214-HP-CLR – This printer is in JB214, made by HP, and is a color printer (indicated by the CLR at the end).
- JB214-HP – This printer is also in JB214, is also made by HP, but is NOT a color printer (as indicated by the lack of CLR on the end)
- UC112C-KM-CLR – This printer is located in UC112C, is a Kyocera Mita, and is also a color printer.
Generally speaking, if it has HP in its name, it is usually just a printer, whereas if it has KM in the name, it is likely a multifunction machine (printer/scanner/copier). Although – as with any rule – there are some exceptions.
Selecting/Adding a Printer
After verifying the printer you desire to print to is not present in your printer list, complete the following.
- Click on the Start button and select Devices and Printers
- Select Add a Printer
- Select Add a network, wireless, or Bluetooth printer (as shown in the screen
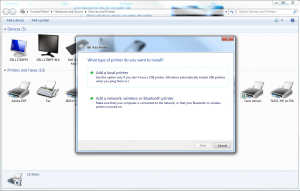 shot below)
 - Select the Network Printer you wish to add from the populated menu (If the print device you wish to print to is not listed, please contact the helpdesk)
- Select Next. This will install the print driver for the selected printer.
- Print a test page to make sure that your printer was successfully added.
Note: In order to print a test page attempt one of the following actions:
- CTRL+P shortcut key for most software products
- File Print in Microsoft Office products.
If you have additional questions, contact Technology Help Desk at 995-3020 or www.nmc.edu/help.
Banner Printing
 For the most part, Banner printing is the same as printing in Windows, but there are a few additions that you should be aware of. In addition to the naming convention described above, there are also key function indicators at the end of the printer name. These indicators add additional functionality, such as printing landscape or duplex (for those printers capable of printing double sided).
Banner Printer Name Suffixes:
- lg = legal
- l = landscape
- s = small
- d = duplex
- etc…
For a full list of Banner printing options, read the Banner Printing helpdesk article.
Keep an Eye out for: Bring Your Own Device (BYOD) Printing Coming Soon!!!
With this information and responsible printing, we can all honor the green goals of NMC and keep documentation accessible in multiple forms, and physically available as needed. If you have any questions about printing and scanning at NMC or Technology in general please feel free to contact the NMC Technology Help Desk at 231-995-3020 or online at www.nmc.edu/help