

Creating an Assessment in Google Forms
Forms are a handy feature in Google that allow quick evaluation. They are easy to distribute using the same sharing steps as Google Docs and Slides. The Forms are highly customizable and can be used for a variety of purposes.
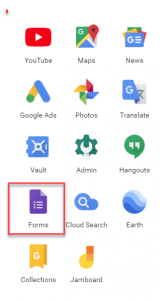 To start with, navigate to your google drive. This can be done by clicking the icon next to your google account profile. When selected, this icon will open up a sub menu. If you do not see the Forms app click the “More” option at the bottom. This will open up another menu showing more Google Apps. Locate the “Forms” application and click on it.
When the form page opens, in the top right there will be a title called “Assessment.” Clicking on this will allow you to edit the title making it easy to keep track of.
![]()
The form is broken up into sections that are separated by headers. There is a main header for the form, which is at the top. There is a header for the Name and Email submission. This is a handy feature that is not required, but recommended. The next section of headers are for the questions.
Questions and Answers
When a question header is selected a menu will appear. From this menu multiple types of edits can be applied to the question and answers.
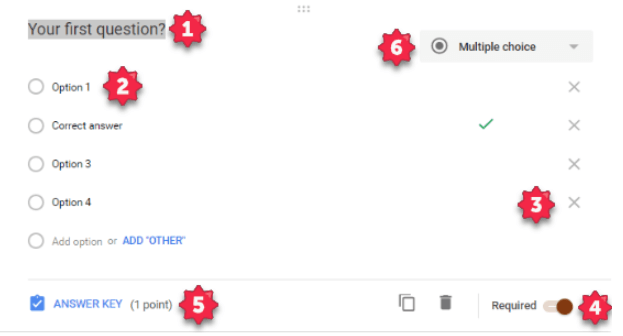
1: Click or highlight this header to change the question.
2: These are the multiple choice answers based on the selected format with #6. Clicking on one of the answers will allow you to change them. You can add more answers by clicking “Add Option.” Clicking ADD “OTHER” will add an “Other” option to the multiple choice selection.
3: Clicking on the X to the right of the multiple choice option will delete that option.
4: This slider will make the section required. For instance you could use this feature to give the user a choice, whether or not to enter their personal information.
5: To select which answer or answers are correct click the ANSWER KEY icon. Then simply click on the correct answer to select it, and click on it again to deselect it. When the answer is highlighted in green it is the correct answer.
6: Clicking on the drop down menu to the top right of the editor will open up a menu. From here you can select the type of question, upload files to the form, the scale and grid options change the appearance of the question. The date and time section can be more informative input from the user.
Question Customization
When you have a question selected, a menu bar will appear on the side. This menu bar has multiple features;![]()
The top + button allows you to add another question.
The next option allows you to import questions from previous forms.
The “T” icon let’s you add titles anywhere in the form. This is useful for breaking up different sections of questions.
This sidebar also allows you to add pictures to the question.
If you want to add videos to go along with your questions, you can click the Play icon. This will open up a video selection tool with a built in YouTube search.
The final button will split the form into separate sections.
Sending the Form
One of the best features of Google forms is that they are easy to distribute. You can send them out via email, or get a link that can be used on a Moodle page. When others click on the email it will take them right to the quiz. When they submit the quiz, their responses save automatically. To send the form click on the SEND button in the top right. This will open up a new menu page.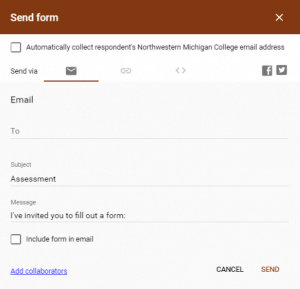
Enter the email of who the form is going out too. You can add multiple emails in this section.
The subject is assigned automatically to the name of your assessment. In the message section you can write a custom message to users that receive the form.
There is an option to include the form in the email. This would be handy if the user needed to quickly access the form.
To get a link which can be used in Moodle click the link icon next to to mail icon.
Responses
At the top of the form there will be two options, “Questions” and “Responses.” By default the form will open to the questions tab. 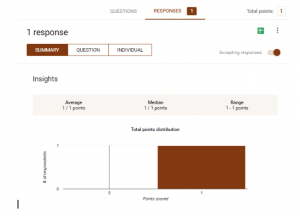
The response tab is where all of the user input goes. This is where you can see what questions were answered correctly, the average of the test, the information about the test taker such as there name and email.
For more assistance, please contact the NMC Technology Help Desk at 231-995-3020 or for chat assistance visit nmc.edu/help.