

You are someplace new, looking for an office in a 3-story building. You walk in and find there is no directory or any kind of information to help you find what you are looking for. Your only choice is to now walk the halls of every floor until you find where you need to go.
That might sound ridiculous, but that in essence, is the experience some students can have with our documents if we create them with no structure. Headings are the directory listing you find upon entering a 3-story building. They give the overall summary of what is where.
For students with low or no vision who rely on screen reading technology to navigate documents, headings can make all the difference. In a large document a screen reader will recognize all the headings and scan through them to help students find exactly where in the document they can find the information/topic they are looking for. Without headings, they have to start at the beginning and listen to everything until they find the information they need.
Including a heading structure in your document is easy. Your overarching topic or title is your Heading 1, each sub-topic under it are your Heading 2s, while Heading 3s are sub-topics that fall under a Heading 2, and so forth.
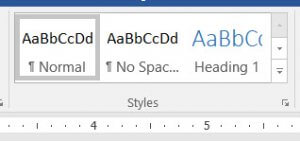
To make a heading, highlight the text and from the Styles area of your ribbon menu, select the correct heading number. Once that is applied you can change the look by making it bigger, smaller, bolded, or a color. Be careful, just changing the look alone does not make something a heading. Applying a specific heading from the Styles menu makes it an official heading.
If you want to know more about headings, feel free to contact me at 995-1978 or strier@nmc.edu.